
Shared mailbox setup
on iPhone (iOS 26)
Two ways to add a Microsoft 365 shared mailbox to your iPhone. We recommend the Outlook app for most users — it's straightforward and keeps everything in one place.
Choose your setup method
Both methods give you full access to the shared mailbox. The Outlook app is simpler and better suited to shared mailboxes. Apple Mail is a good option if you prefer to keep everything in one place.
Before you begin
Make sure your IT administrator has granted you Full Access permission to the shared mailbox in Microsoft 365. You'll also need your own personal Microsoft 365 email address and password ready. If you haven't already installed Outlook on your iPhone, download it from the App Store first.
Overview — 7 steps, around 3 minutes
- Download and open Microsoft Outlook
- Sign in with your personal M365 account
- Open the account menu
- Tap "Add a Shared Mailbox"
- Enter the shared mailbox address
- Confirm and wait for it to connect
- Done — the shared inbox is now accessible
Download Microsoft Outlook from the App Store
If Outlook isn't already installed on your iPhone, you'll need to download it first. Tap the button below to open the App Store on your phone, then tap Get to install. The app is free.
Sign in with your personal Microsoft 365 account
Open Outlook. If this is your first time, you'll be prompted to add an account — enter your own Microsoft 365 email address (not the shared mailbox address) and tap Next. You'll be taken to the Microsoft sign-in screen; enter your password and tap Sign in.
If your business uses two-factor authentication (almost all do), approve the prompt on the Microsoft Authenticator app or enter the SMS code when asked.
Open the account switcher
Once you're in your Outlook inbox, tap the profile icon (your initials or photo) in the top-left corner of the screen. The account switcher will slide out from the left edge.
You'll see your existing accounts as a column of icons on the far left. At the bottom of that column you'll see a + icon — that's the button you'll tap in the next step to add the shared mailbox.
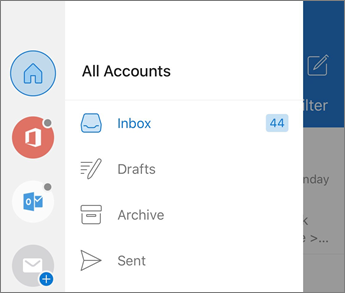
The account switcher in Outlook for iOS — note the + icon at the bottom of the left column.
Tap "Add Shared Mailbox"
An action sheet will slide up from the bottom of the screen with three options: Add Account, Add Shared Mailbox, and Add Storage Account. Tap Add Shared Mailbox.
If you don't see this option, your organisation's IT administrator may need to enable shared mailbox access first. Give us a call and we can help.
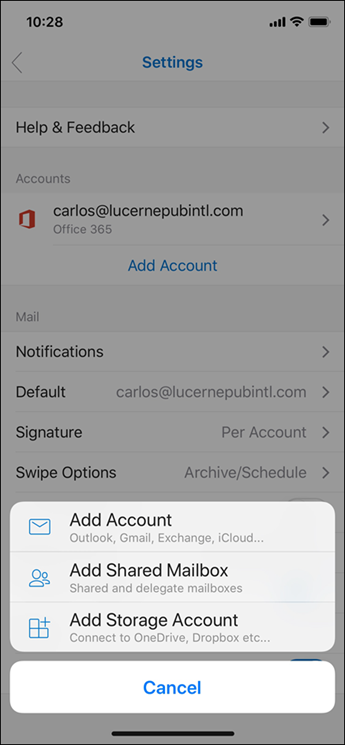
Tap Add Shared Mailbox in the action sheet at the bottom.
Enter the shared mailbox email address
The Add Shared Mailbox screen will appear with a single field labelled "Enter the shared or delegate email". Type in the address of the shared mailbox — for example, reception@yourcompany.com.au or info@yourcompany.com.au — then tap the blue Add Mailbox button.
This is the shared address, not your personal one. Your IT administrator or manager will be able to confirm the address if you're not sure.
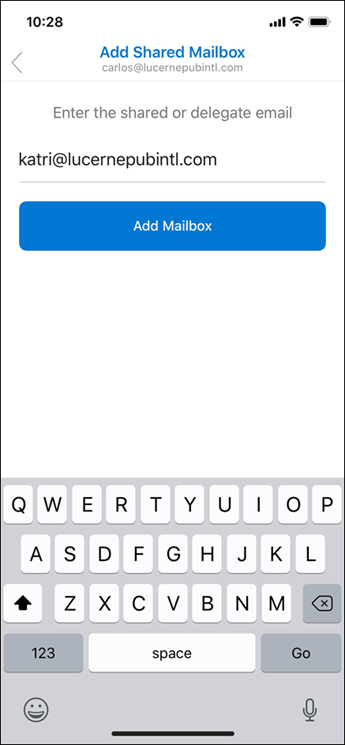
Enter the shared address, then tap the blue Add Mailbox button. Example email shown — yours will be different.
Confirm and wait for it to connect
Tap Add Mailbox. Outlook will verify that you have access to the shared mailbox using your existing Microsoft 365 credentials. This usually takes 10–30 seconds.
No additional password is required — Outlook uses the access permission your administrator has already set up for you.
All done — the shared inbox is ready
Once connected, the shared mailbox will appear in the Outlook sidebar beneath your personal inbox. Tap it to open it and see the shared emails.
When you compose a new email or reply, you'll be able to choose whether to send it from your personal address or from the shared mailbox address.
Step 3 screenshot reproduced from Microsoft Support.
Before you begin
Your IT administrator must have granted you Full Access permission to the shared mailbox in Microsoft 365. The trick with this flow is: you'll enter the shared mailbox's email address — but when iOS prompts you for a password, you use your own Microsoft 365 password (shared mailboxes don't have their own passwords).
Overview — 7 steps, around 5 minutes
- Open Settings → Apps → Mail → Mail Accounts → Add Account
- Choose Microsoft Exchange
- Enter the shared mailbox email and a description
- Sign in with your own Microsoft 365 password
- Approve the permissions prompt
- Choose what to sync and tap Save
- Open Mail — the shared inbox is there
Open Settings and find Mail Accounts
Open the Settings app on your iPhone. Scroll down and tap Apps, then tap Mail, then tap Mail Accounts.
You'll see a list of any email accounts already on your iPhone (often iCloud, by default). Tap Add Account.
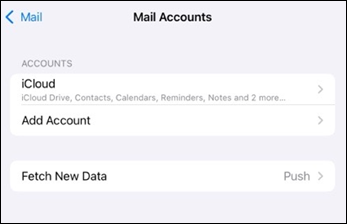
The Mail Accounts screen — tap Add Account.
Choose Microsoft Exchange
You'll be shown a list of email providers. Tap Microsoft Exchange — this is the correct option for both Microsoft 365 mailboxes and traditional Exchange shared mailboxes.
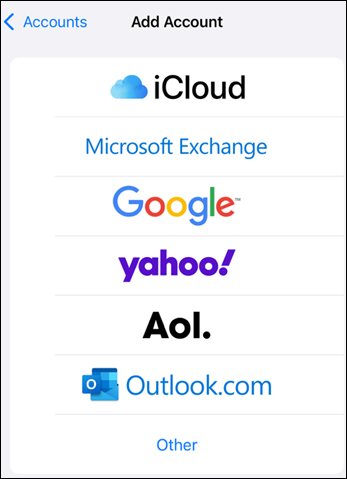
Tap Microsoft Exchange — not Outlook.com.
Enter the shared mailbox email and a description
This is the most important part of the flow. In the Email field, type the shared mailbox's email address — for example, reception@yourcompany.com.au. In the Description field, give it a name you'll recognise — "Reception", "Info inbox", or similar. Tap Next in the top-right.
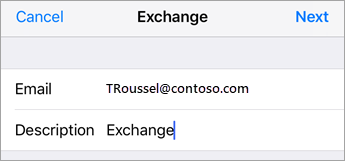
Enter the shared mailbox email (not your own) and a description, then tap Next.
A small panel will appear asking how you want to sign in. Tap Sign In.
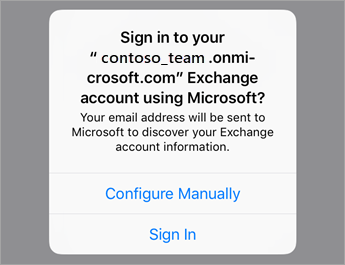
Tap Sign In — not Configure Manually.
Sign in with your own Microsoft 365 password
You'll be redirected to a Microsoft sign-in screen. Here's the bit that catches people out: although the email field above shows the shared mailbox, you sign in using your own credentials. Microsoft will then verify that you have Full Access permission and connect the shared mailbox on your behalf.
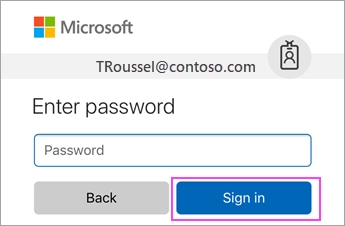
Enter your own Microsoft 365 password. Example email shown — the actual sign-in will be against your own account.
If your business uses two-factor authentication (almost all do), you'll then be asked to approve the sign-in — either by tapping Approve in the Microsoft Authenticator app, or by entering a six-digit SMS code. Follow whichever prompt appears.
Approve the permissions prompt
You may see an iOS Accounts needs permission to… screen explaining that iOS will be accessing your mailbox and reading your profile. Tap Accept to continue. This is a one-time prompt and is required for the Mail app to work.
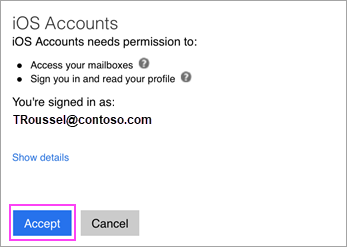
Tap Accept to grant the standard mailbox permissions.
Choose what to sync — and tap Save
Finally, you'll see a list of toggles for what to sync. For a shared mailbox, our recommendation is:
- Mail — on (the whole point)
- Contacts — off (avoids duplicating with your personal contacts)
- Calendars — off, unless the shared mailbox has its own calendar you need
- Reminders — off
- Notes — off
Tap Save in the top-right corner.
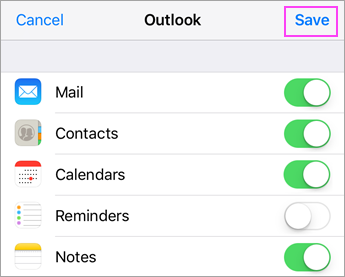
Choose what to sync, then tap Save in the top-right.
Open Mail — the shared inbox is there
Open the Mail app on your home screen. You'll now see two inboxes — your personal one and the shared mailbox under the description name you chose (e.g. Reception). Tap into the shared mailbox to read its emails.
When you reply or compose from the shared inbox, iOS will automatically use the shared mailbox as the sender so the recipient sees the team address — not your personal address.
Step screenshots reproduced from Microsoft Support.
Something not quite right?
If you're seeing an error or the steps look different on your device, give us a call. We're happy to walk you through it, or connect remotely to sort it out for you.