
Set up your Outlook email on iPhone.
This guide adds your Microsoft 365 or Outlook email account to the Mail app that comes built into your iPhone — no extra app to install. Follow the steps with screenshots below; the whole process takes about five minutes.
Before you begin
You'll need:
- Your Microsoft 365 work email address (e.g. yourname@yourcompany.com.au)
- Your Microsoft 365 password
- Your phone's authenticator app or SMS access for two-factor verification
If you're unsure about any of these, give us a call before you start — we'll walk you through it.
Open Settings and find Mail Accounts
Open the Settings app on your iPhone. Scroll down and tap Apps, then tap Mail, then tap Mail Accounts.
You'll see a list of any email accounts already on your iPhone (often iCloud, by default). Tap Add Account.
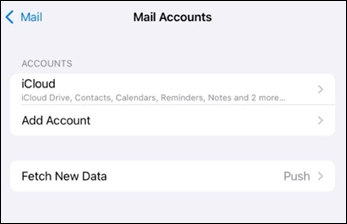
The Mail Accounts screen — tap Add Account.
Choose Microsoft Exchange
You'll be shown a list of email providers. Tap Microsoft Exchange — this is the correct option for both Microsoft 365 and traditional Exchange email accounts.
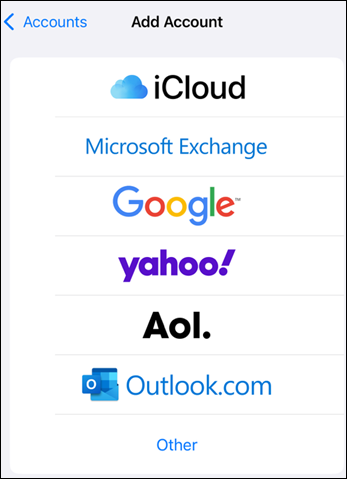
Tap Microsoft Exchange — not Outlook.com.
Enter your email address and a description
In the Email field, type your full work email address. In the Description field, give the account a name you'll recognise — for example, your business name, or simply "Work". Tap Next in the top-right corner.
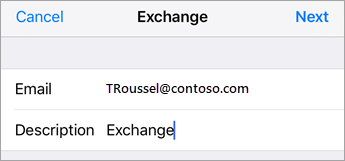
Enter your work email and a description, then tap Next.
A small panel will appear asking how you want to sign in. Tap Sign In — this lets Microsoft handle the authentication securely.
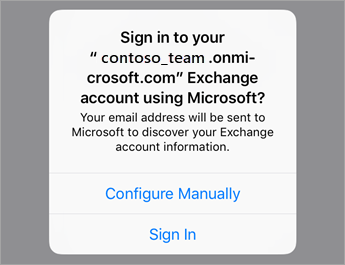
Tap Sign In — not Configure Manually.
Sign in with your Microsoft 365 password
You'll be redirected to a Microsoft sign-in screen. Your email address is usually pre-filled — just tap Next, then enter your password and tap Sign in.
If your business uses two-factor authentication (almost all do), you'll then be prompted to approve the sign-in. This is usually done by:
- Tapping Approve in the Microsoft Authenticator app on your phone, or
- Entering a six-digit code sent to you by SMS.
Follow whichever prompt appears on screen.
Allow Mail to access your account
You may see a permission prompt asking whether the Mail app can access certain things on your behalf — such as reading your inbox, sending emails as you, and accessing your calendar. Tap Accept to continue.
This is a one-time prompt and is required for the Mail app to work. The permissions are between your iPhone and Microsoft 365 — nothing is shared with anyone else.
Choose what to sync — and you're done
Finally, you'll see a list of toggles for what to sync to your iPhone:
- Mail — your inbox, sent items, and folders
- Contacts — your work address book
- Calendars — meetings and appointments
- Reminders — Outlook tasks (optional)
- Notes — Outlook notes (optional)
For most users we recommend leaving Mail, Contacts, and Calendars turned on. Tap Save in the top-right corner.
Your new account will appear in the Mail Accounts list. Open the Mail app on your home screen — your work emails will start to sync within a minute or two.
Screenshots in steps 1–3 are reproduced from Microsoft Support for clarity. All other content is original to Hello Computer.
Need a hand?
If you get stuck at any point, our team is happy to walk you through the setup over the phone or via remote support.